Pay in installments of $6.70 with
 ,
,
 and
and

Shipping Estimate
USA
- USA
- CAN
- USA
- CAN
Ships within 48 hours · Estimated delivery Sep 22 - Sep 27
 Promo Codes Available:
For Your Every Summer RSVP, with Code: SUMMER15
Description
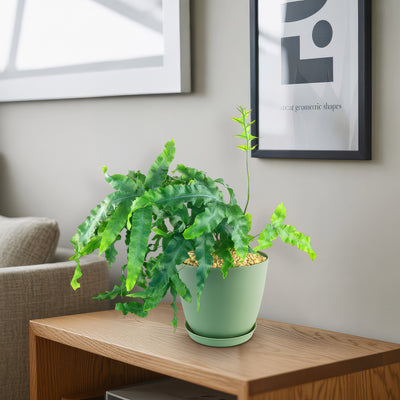
blue star fern soil mix Blue Star Fern ‘Phlebodium aureum’ 2 Gal. / Self Watering / Without PotThe Blue Star Fern, known as Phlebodium aureum, is a unique and increasingly popular fern for beginners as needs less humidity than other varieties. Its broad, blue green fronds have an unusual, almost wavy texture that lends an exotic feel to any indoor space. In the wild, it grows epiphytically on trees, making it well suited for mounting on surfaces or planting in hanging baskets where its fronds can cascade beautifully. Native to South and Central
The Blue Star Fern, known as Phlebodium aureum, is a unique and increasingly popular fern for beginners as needs less humidity than other varieties. Its broad, blue-green fronds have an unusual, almost wavy texture that lends an exotic feel to any indoor space. In the wild, it grows epiphytically on trees, making it well-suited for mounting on surfaces or planting in hanging baskets where its fronds can cascade beautifully.
Native to South and Central America, the Blue Star Fern gets its name due to the soft, bluish hue of its fronds that resemble star-like shapes when viewed from above.
It has several other common names such as Blue Star Fern, Cabbage Palm Fern, Golden Polypody, Gold Foot Fern, Hare Foot Fern, and Rabbits Foot Fern.
Its popularity stems not only from its visual appeal but also from its ability to improve indoor air quality, making it an attractive, functional addition to any home or office.
A popular feature of the Blue Star Fern is its deeply lobed, velvety fronds, which can grow up to 2 feet long and spread up to 6 feet wide in ideal conditions.
The fronds emerge from a creeping rhizome, which often has a slightly golden tint, adding an additional layer of color to the plant’s appearance. Its foliage has a soft, almost fuzzy texture, giving it a unique tactile quality not commonly found in other ferns.
The large blue star fern is a striking addition to any indoor plant collection, with its vibrant color and unique shape. Its moderate growth rate allows it to fill its space gradually, making it easy to care for and less prone to outgrowing its container quickly.
As a non-flowering plant, the Blue Fern does not produce blooms, but its vibrant foliage more than compensates for the lack of flowers, providing year-round greenery and aesthetic appeal.
When and How to Water Your Blue Star Fern
The Blue Star Fern requires less water and easier to care for than other ferns. This fern is somewhat more resilient than typical tropical varieties, able to go a bit longer between watering sessions without suffering damage. However, allowing the soil to completely dry out is not recommended, as it can lead to stress and browning of leaves.
In the spring and fall, during the growing season, your Blue Star Fern requires more frequent watering. Water it thoroughly whenever the top inch of soil feels dry to the touch. In most indoor environments, watering every 7–10 days is ideal, depending on the humidity levels. The goal is to keep the soil evenly moist but not soggy, as waterlogged conditions can harm the plant’s delicate roots. Adjust the frequency based on your home’s temperature and humidity; higher temperatures or drier air may require more frequent watering.
In late fall and winter, during its dormancy period, the Blue Star Fern’s water needs decrease significantly. Water only when the soil is nearly dry, roughly every two to three weeks, as the plant’s growth slows and its water usage drops. The plant can withstand brief periods of dryness during dormancy but will benefit from occasional misting if indoor air is particularly dry. This more conservative watering schedule helps the fern maintain health without overstimulating it during its resting phase.
Light Requirements – Where to Place Your Blue Star Fern
When growing indoors, Blue Star Ferns prefer bright, indirect light for around 6–8 hours daily. Position it near a north- or east-facing window where it can receive gentle morning sunlight or filtered light throughout the day.
Direct sunlight should be avoided, as it can cause the leaves to scorch and fade in color.
In lower-light settings, this fern can still thrive, although its growth may slow slightly. Supplemental artificial lighting can help maintain vibrant foliage in dim indoor spaces.
For outdoor cultivation, place your Phlebodium aureum blue star in a shaded or partially shaded area.
A spot under a canopy or larger tree where it receives dappled sunlight for part of the day is ideal.
If the plant shows signs of fading color or wilting, try relocating it to a spot with more filtered shade.
Optimal Soil & Fertilizer Needs
Blue Star Ferns thrive in well-draining, organic-rich soil that retains moisture but doesn’t become waterlogged. An ideal mix for indoor potted plants is a combination of standard potting soil and orchid bark or perlite to enhance drainage. Ideally, you want to use our specialized potting mix, opens in a new tab that contains 5 natural substrates and organic mycorrhizae to promote the development of a strong root system that helps your ferns to thrive.
For fertilizer, Blue Star Ferns benefit from light feeding during the growing season, roughly once a year from spring to early fall. Use a balanced, NPK fertilizer with an equal ration of about 5-10-5 to avoid overwhelming the plant. Avoid high-nitrogen fertilizers, as these may encourage foliage growth at the expense of root health. During the dormant winter months, fertilizing holds off, as the fern’s nutrient requirements are minimal when growth slows.
Hardiness Zones & More
When grown indoors, your Blue Star Fern thrives in moderate, indirect light and prefers a consistent indoor temperature range between 60-75°F, making it ideal for home environments. It does best when shielded from direct sunlight, which can scorch its fronds but also needs ample ambient light to thrive. The Blue Star Fern appreciates moderate humidity levels of 40-60%, which can be achieved with a humidifier or occasional misting, particularly in winter or dry climates.
For outdoor cultivation, this fern is suited for USDA Zones 8-12, where it can survive mild winters but will require a shaded spot to avoid excessive sun exposure. It can withstand temperatures down to 20°F but should be protected from frost and intense afternoon sun.
It also benefits from higher humidity, so if grown in drier zones, placing it near water features or misting it occasionally will help maintain its lush appearance. The blue star fern's dry leaves are a sign that it needs more humidity in its environment. Make sure to mist the plant regularly or place a humidifier nearby to help prevent further leaf dehydration.
Wildlife – Blue Star Fern Attracts the Following Friendly Pollinators
While Blue Star Fern is not a traditional pollinator attractant like flowering plants, it creates a welcoming environment for beneficial insects that support local biodiversity. Its dense fronds provide shade and moisture, which helps attract small, beneficial creatures in shaded outdoor gardens.
According to the ASPCA, Blue Star Fern is non-toxic to humans, cats, dogs, and birds. This makes it an ideal choice for pet-friendly homes, as it poses no risk to animals that may chew on their fronds.
How to Propagate Your Phlebodium aureum
To propagate Blue Fern, start by dividing its rhizomes during spring or early summer. Gently remove the plant from its pot, shake off excess soil, and separate the rhizomes into smaller sections, each with fronds and roots. Replant each division in a suitable pot with fresh, well-draining potting mix, water thoroughly, and place in a warm area with indirect light. Within a few weeks, the new divisions should begin to establish, showing signs of growth.
Key Takeaways
- In the wild, it grows epiphytically on trees, making it well-suited for mounting on surfaces or planting in hanging baskets where its fronds can cascade beautifully.
- Its unique blue-green, wavy fronds with a soft, almost velvety texture give it a distinctive look, making it a striking and popular choice for indoor decor.
- Blue Star Fern is a low-maintenance plant that tolerates lower light levels, and indirect light and requires minimal care compared to many other ferns, making it well-suited for beginners.
- The blue fern can tolerate mild frost in USDA zones (8-12) and lower temperatures for short periods, making it versatile for indoor and sheltered outdoor use in suitable climates.
- Unlike many other ferns, Blue Star Fern has some drought tolerance and can go without frequent watering, though it prefers consistently moist soil.
The Bottom Line
Overall, the Blue Star Fern (Phlebodium aureum) is a distinctive and popular houseplant that brings a touch of the tropics indoors with its striking blue-green, wavy fronds and epiphytic nature. Known for its adaptability, this fern thrives in moderate, indirect light and can tolerate occasional drought and lower humidity, making it easier to care for than many other ferns. While it prefers consistently moist soil, it is relatively low-maintenance and capable of withstanding mild frost, making it a versatile option for a range of indoor and sheltered outdoor spaces. With its unique appearance, air-purifying benefits, and pet-safe qualities, the Blue Star Fern is an excellent choice for anyone seeking a beautiful, easy-to-care-for addition to their plant collection.
Shipping Notes
- Free Standard Shipping on $100+ Orders to the USA.
- Except Preorder products are shipped in 48 hours.
- Delivery to the USA:
- Standard Shipping : 3-10 business days
- If time is of the essence, please consider selecting expedited delivery for faster service.
Exchange/Return Notes
- We offer a 30-day return/exchange service after receiving.
- Final sale items are not eligible for returns or exchanges.
- To process your return/exchange, please contact us at [email protected]
- Please click here for more details>>> Return & Exchange Policy