Pay in installments of $5.80 with
 ,
,
 and
and

Shipping Estimate
USA
- USA
- CAN
- USA
- CAN
Ships within 48 hours · Estimated delivery Sep 28 - Oct 3
 Promo Codes Available:
For Your Every Summer RSVP, with Code: SUMMER15
Description
ruby hanging plant Shop 'Ruby Necklace Plant - Othonna capensis' Care and Growing GuideThe Ruby Necklace Plant, botanically known as Othonna capensis, is a unique and eye catching trailing succulent prized for its vibrant color and cascading growth habit. Popular as a hanging plant, its long trailing stems spill beautifully over containers, showcasing striking ruby red, bean shaped leaves that resemble tiny necklace pendants. Native to South Africa, this trailing succulent has several other common names, such as a string of pickles, a
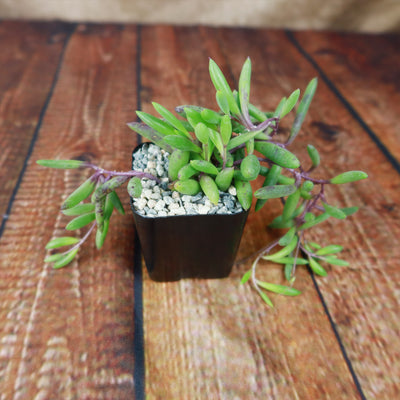
The Ruby Necklace Plant, botanically known as Othonna capensis, is a unique and eye-catching trailing succulent prized for its vibrant color and cascading growth habit. Popular as a hanging plant, its long trailing stems spill beautifully over containers, showcasing striking ruby-red, bean-shaped leaves that resemble tiny necklace pendants.
Native to South Africa, this trailing succulent has several other common names, such as a string of pickles, a string of rubies, and a little pickle. This ruby necklace plant is a true beauty that can add a pop of color to any indoor or outdoor space!
The bean-shaped plump leaves of the ruby necklace plant are fleshy and cylindrical. When exposed to direct sun for at least 5-6 hours a day, this sun-loving succulent's foliage color will change from lush green to vibrant red.
They grow densely along the stems, creating a cascading effect that makes them a popular choice for hanging baskets or trailing over the edges of containers
The ruby necklace plant has thin and delicate stems that can grow up to 6.6 ft. long and 2 inches tall; adding to the ruby necklace plant's graceful appearance.
The ruby necklace's most popular feature is its stunning foliage, which has cascading strands of vibrant green leaves that turn reddish in bright sunlight and excellent shape. These string of rubies succulent plants are extremely fast-growing and easy to care for.
The flowers of the ruby necklace plant are like little daisies. During mid-spring through fall or year-round, it produces these yellow, small, daisy-like flowers that add a bright contrast to the foliage.
The ruby necklace plant Belongs to the Asteraceae family and is related to the Senecio, including its popular String of Hearts, String of Dolphins, String of Pearls, and more.
When and How to Water Your Ruby Necklace Plant
The Ruby Necklace plant prefers moderate but careful watering, similar to the dry coastal conditions of its native South African habitat. It grows best when watered using the “soak and dry” method, where the soil is thoroughly watered and then allowed to dry out before watering again.
The Ruby Necklace succulent should be watered about once every 1 to 2 weeks and only water once every 3-4 weeks to keep the soil relatively dry.
In spring and summer, water deeply enough to moisten the soil evenly, but never let the plant sit in soggy soil. By inserting your finger about an inch into the soil, you can determine the moisture level. If it feels dry at that depth, it's a good indication that it's time to water. Be sure to water thoroughly and let the excess water drain out of the pot.
In fall and winter, reduce watering since the plant becomes less active. Watch for signs such as shriveled leaves, limp stems, or dull coloring, which may indicate the plant needs water.
Light Requirements - Where to Place Your Ruby Necklace Plant
When growing indoors, place your Ruby Necklace plant near a south facing or west facing window where it can receive 4 to 6 hours of direct sunlight.
If your home does not get enough natural light, consider supplementing with artificial grow light to ensure it receives adequate light.
When growing outdoors, this succulent thrives best in a bright sunny location with partial to full sun exposure. However, it's important to avoid exposing it to direct sunlight over 6 hours daily, especially during the hottest parts of the day.
If you notice the leaves of this beautiful plant turning yellow or brown, it may be a sign that your necklace plant is getting too much direct sunlight.
Optimal Soil & Fertilizers
The Ruby Necklace plant prefers a light, airy, well-draining succulent soil mixes, that has a high content of nutrients, making it ideal for growing these succulents. Ideally, ypou can use our specialized potting mix that contains 5 natural substrates and mycorrhizae to promote the development of a strong root system that helps your succulent to thrive.
When fertilizing your Ruby Necklace plant, keep feeding light and seasonal. Do not over fertilize it, as too much fertilizer can damage the roots and cause weak, leggy growth. A diluted, low nitrogen fertilizer or a balanced fertilizer with an NPK ratio of 5-10-5 works well to support healthy foliage and trailing stem growth.
Hardiness Zone & More
In the United States, the ruby necklace plant is mostly an indoor plant, but if you live in southern Florida or Hawaii, then you can cultivate it outdoors in USDA zones 9-11.
It thrives in average room temperatures ranging from 60°F to 75°F and can tolerate slightly cooler temperatures in the winter.
This plant is fairly adaptable and can tolerate average indoor humidity levels. However, it appreciates a bit of extra humidity, so misting the leaves occasionally or placing a tray of water nearby can help create a more favorable environment.
If you live in a drier climate, you can also use a humidifier to maintain the desired humidity level. Just be cautious not to place the plant directly in front of an air conditioner or heating vent, as fluctuating temperatures and dry air can negatively impact its health.
How to Grow as a Houseplant
You can grow your Ruby Necklace succulent indoors by giving it 4 to 6 hours of bright sunlight each day. Place it in a south or west facing window to help maintain its vibrant purple stems and healthy trailing growth.
Keep the plant in a warm spot between 65°F and 80°F, and protect it from temperatures below 50°F. It prefers low humidity and adapts well to normal indoor conditions without needing extra moisture in the air. Use a well draining succulent soil and water only when the soil has dried out completely.
Wildlife – Ruby Necklace Flowers Attract the Following Friendly Pollinators
When the Ruby Necklace plant blooms, its small yellow daisy like flowers can attract a variety of helpful pollinators such as bees, butterflies, hummingbirds and other beneficial insects. These blooms provide a light source of nectar to these friendly pollinators especially during the warmer months.
According to ASPCA, the 'Othonna capensis' is considered non toxic to human, cats, and dogs making it suitable choice for indoor spaces. However, it is still best to prevent pets or small children from chewing on the plant, as it may occasionally cause mild stomach discomfort or digestive upset.
How to Propagate Ruby Necklace Succulent
To propagate the Ruby Necklace succulent, you can take stem cuttings. With time and proper care, the cutting should develop roots and grow into a new plant. Additionally, if you happen to damage a few leaves or stems, don't worry. You can use these cuttings for propagation. It's an exciting way to expand your collection of Ruby Necklace plants.
Key Takeaways
- The Ruby Necklace is a trailing houseplant that develops stunning purple and ruby colored stems when exposed to bright sunlight.
- Its trailing growth makes it perfect for hanging baskets, shelves, and cascading succulent displays.
- It produces bright yellow daisy like flowers bloom beautifully against the plant’s colorful foliage.
- This drought tolerant succulent thrives on neglect and prefers the soak and dry watering method.
- It is considered non toxic to cats, dogs, and humans, making it a great indoor plant choice.
Final Thoughts
Overall, the Ruby Necklace plant (Othonna capensis) is a stunning houseplant with trailing stems and vibrant ruby red foliage that instantly adds color to indoor spaces. It's a perfect choice for hanging baskets or as a cascading plant on shelves. This plant thrives in bright, indirect light and prefers well-draining soil. When it comes to watering, it's best to allow the soil to dry out between waterings to prevent overwatering. With its eye-catching color and easy care requirements, the Ruby Necklace plant is sure to be a showstopper in any succulent collection.
Shipping Notes
- Free Standard Shipping on $100+ Orders to the USA.
- Except Preorder products are shipped in 48 hours.
- Delivery to the USA:
- Standard Shipping : 3-10 business days
- If time is of the essence, please consider selecting expedited delivery for faster service.
Exchange/Return Notes
- We offer a 30-day return/exchange service after receiving.
- Final sale items are not eligible for returns or exchanges.
- To process your return/exchange, please contact us at [email protected]
- Please click here for more details>>> Return & Exchange Policy