SKU: 27854190245
jade & co succulent boutique llc

jade & co succulent boutique llc Botany Bay Jade Plant

Sale price$19.53 Regular price$21.70
Save 10%

Pay in installments of $5.42 with ShopPay, AfterPay and Klarna

Shipping Estimate
USA
  • USA
  • CAN

Ships within 48 hours · Estimated delivery Sep 30 - Oct 5

Promo Codes Available:

For Your Every Summer RSVP, with Code: SUMMER15

Description

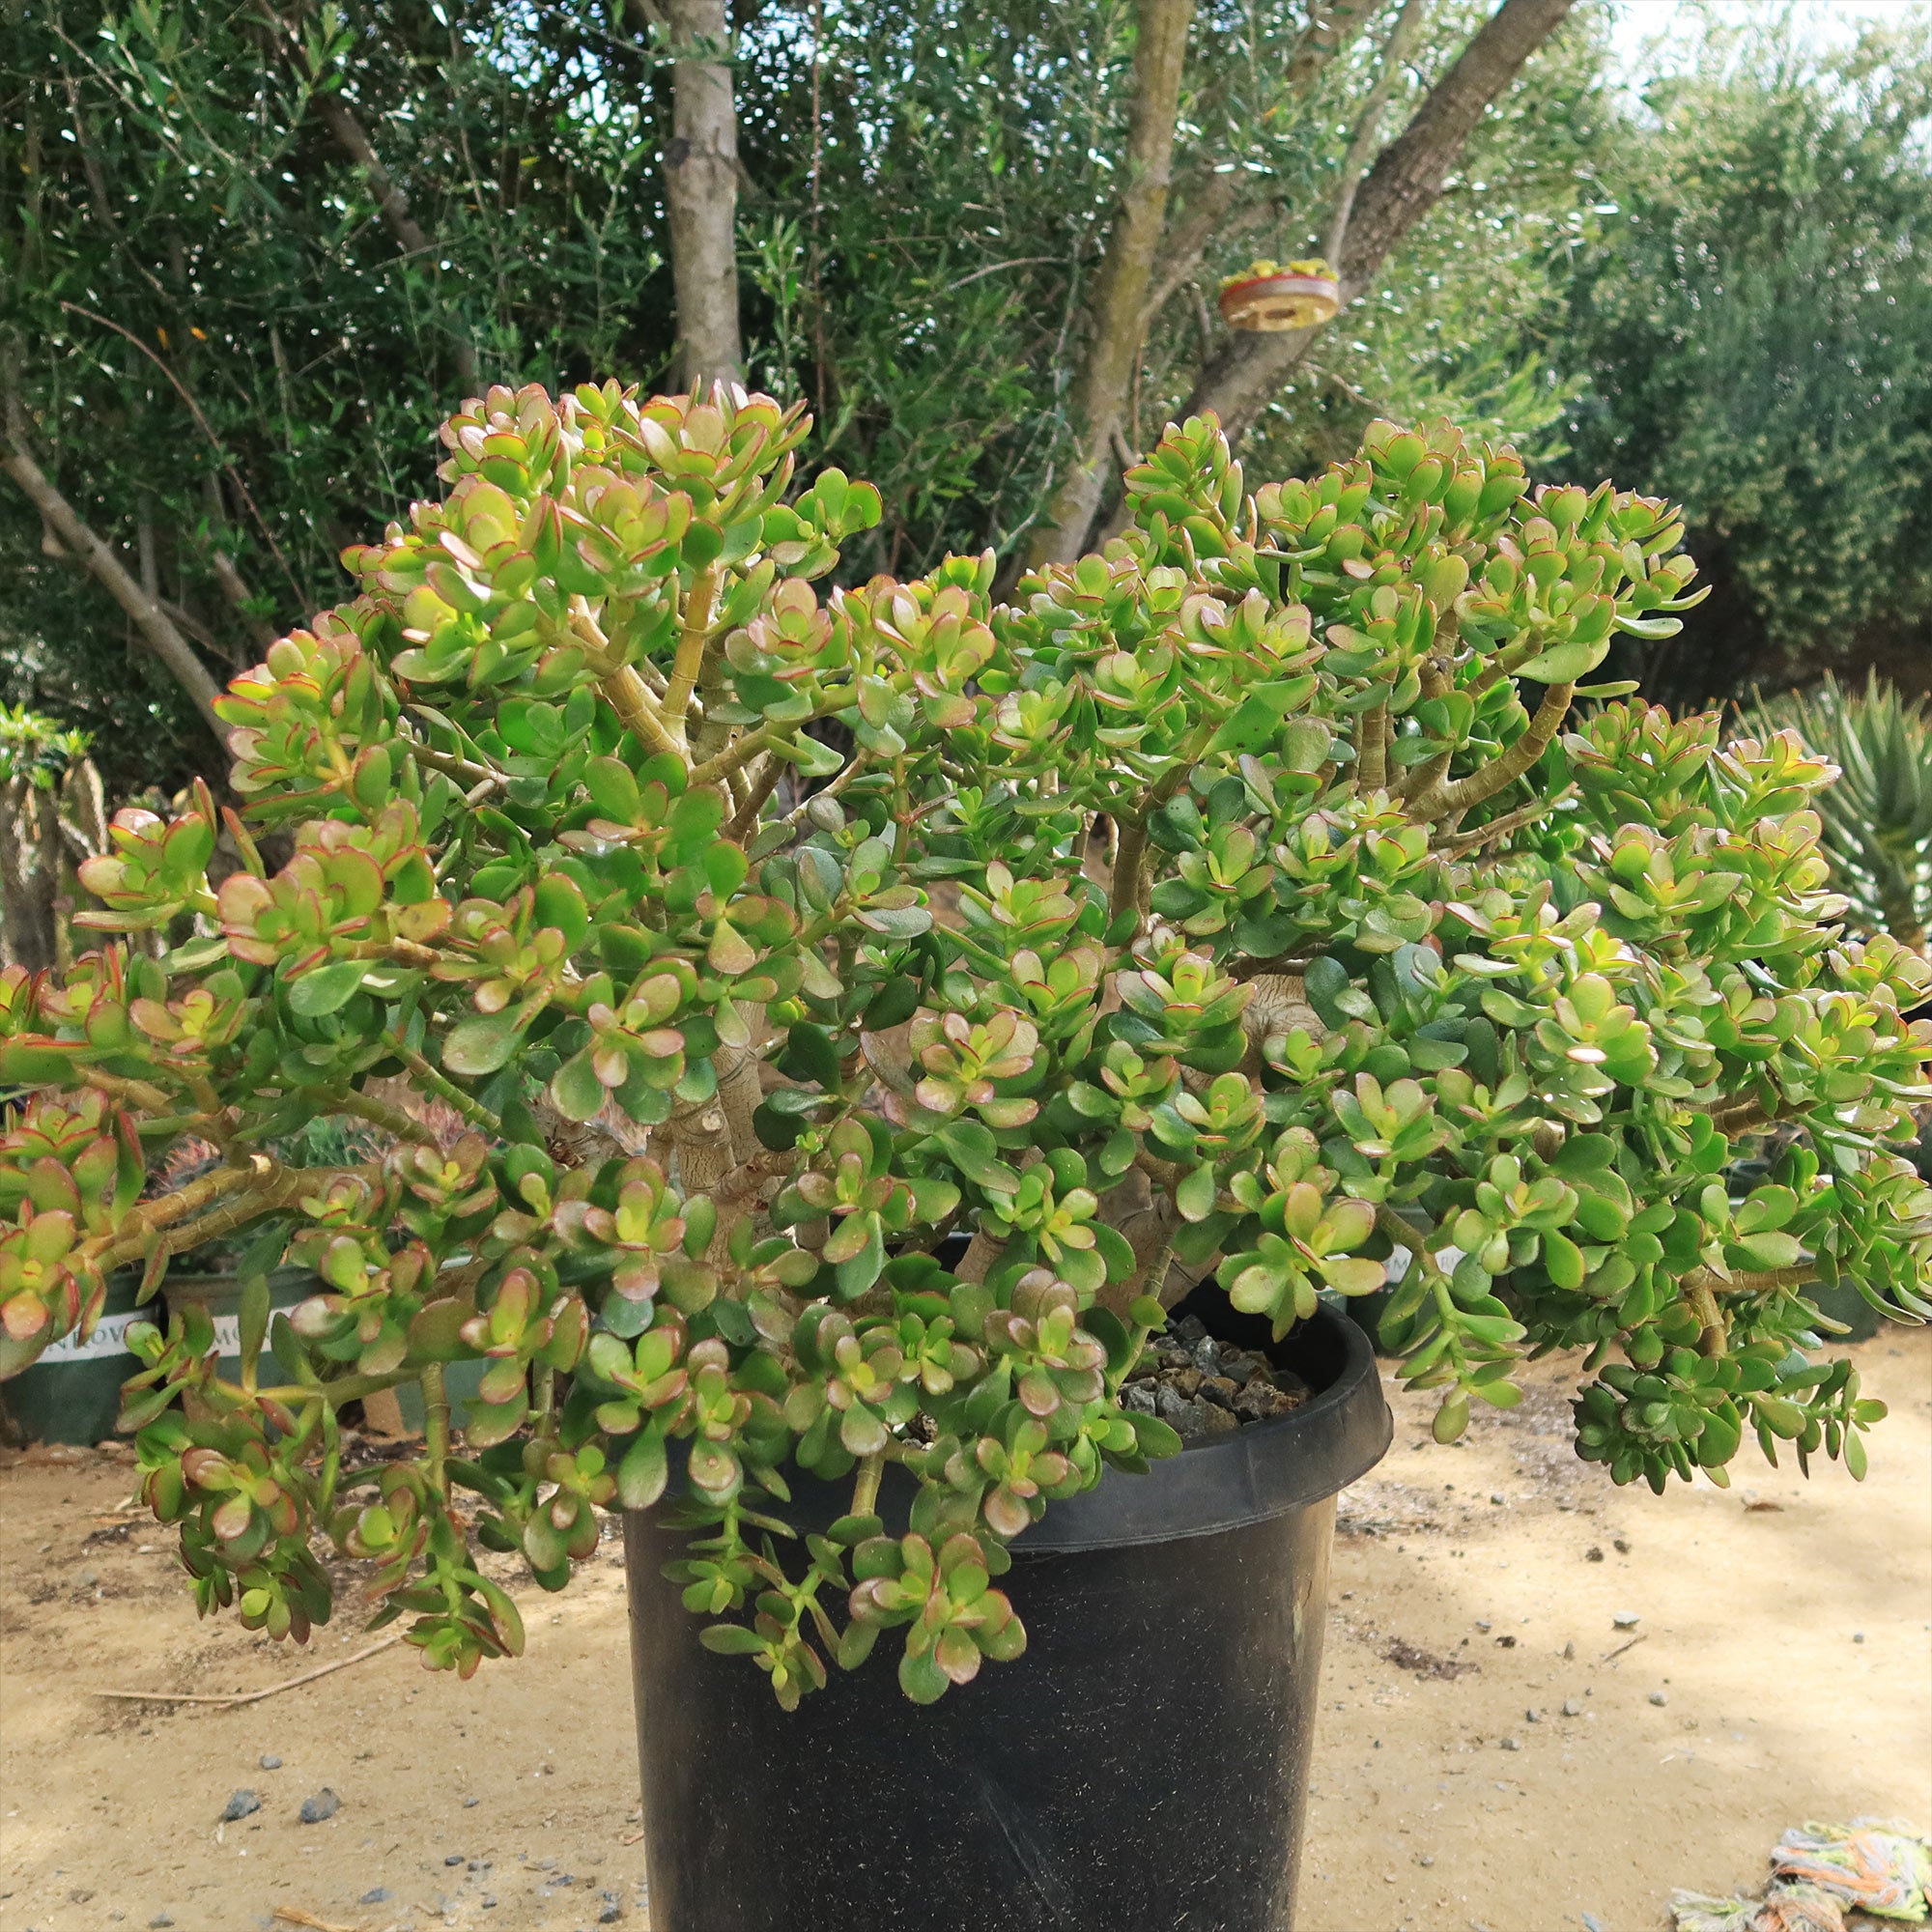
jade & co succulent boutique llc Botany Bay Jade PlantThe Botany Bay Jade plant, known as the Crassula ovata 'Botany Bay', is a popular Jade plant known for its unique foliage and low maintenance care. This Crassula succulent is one of the most widely distributed flowering succulents out there. Additionally, "Botany Bay" is the name of a location in Australia where significant botanical discoveries were made. This image features a lush, mature Botany Bay Jade plant with tightly packed, glossy green

The Botany Bay Jade plant, known as the Crassula ovata 'Botany Bay', is a popular Jade plant known for its unique foliage and low-maintenance care. This Crassula succulent is one of the most widely distributed flowering succulents out there. Additionally, "Botany Bay" is the name of a location in Australia where significant botanical discoveries were made.

This image features a lush, mature Botany Bay Jade plant with tightly packed, glossy green leaves forming a dense, bonsai-like canopy.

In Chinese culture, Crassula ovata is known as the "money tree" or "feng shui money tree" and is believed to bring good luck and financial prosperity to those who grow it.

This money plant is often given as a gift during the Chinese New Year or other auspicious occasions.

Native to South Africa and Mozambique, this evergreen beauty can grow up to 3 feet tall and 2 feet wide, depending on its conditions (so make sure you give it plenty of root space!).

During summertime, those glossy green tubular leaves shine brightly, but as we head into cooler temperatures, those edges start turning red - talk about stunning! 

The star-shaped flowers of the jade plant bloom in late winter to early spring with white flowers that create an eye-catching contrast between open blossoms and closed buds. These pollinated flowers produce seeds enclosed in these buds.

Money tree plants are exceptionally easy to propagate by leaf or stem cuttings, so you can quickly grow your collection with just a few simple steps.

The jade succulents typically go dormant during the winter months, from late fall to early spring. During this period, the plant will stop growing and may lose some of its leaves. This is a natural process and is not harmful to the plant. To encourage its growth during dormancy, the plant should be kept in a cool, dark location and reduced watering. 

So, whether you call it a jade plant, lucky plant, or money tree, Crassula ovata is definitely worth adding to your collection! 

When and How to Water Your Botany Bay Jade Plant 

The Botany Bay Jade plant succulent is naturally drought-tolerant, having evolved to store water in its thick, fleshy leaves. This makes it particularly well-suited to indoor environments where frequent watering isn’t ideal. Like most succulents, it thrives when watered using the soak-and-dry method, thoroughly saturating the soil and allowing it to dry out completely before the next watering. The Crassula ovata ‘Botany Bay’ prefers watering 10-14 days once every growing season, and once every 3-4 weeks in the dormant season.

In spring and summer, during the active growing season, the jade plant will appreciate slightly more frequent watering once every 10 to 14 days. Always check the soil moisture before watering. If the top 2 inches are dry and the pot feels noticeably lighter, it’s time to water again. Bright, indirect light and warm indoor temperatures will also cause the plant to use water more quickly during this time.

In fall and winter, during the dormant season, growth slows considerably, and so should your watering routine. Watering once every 3 to 4 weeks is often sufficient, especially in cooler homes where evaporation is slower. Be extra cautious during this period; moist, cold soil is a recipe for root rot. Reduce watering frequency and avoid misting or adding humidity, as this succulent prefers dry air year-round.

Light Requirements - Where to Place Your Jade Plant 

When grown indoors, place your Jade plant in the brightest sunny place in your house, where it gets 4-6 hours of bright light daily.

Direct sunlight can scorch the new leaves off, so placing them near a window that receives filtered or indirect light is best. 

The amount of light the plant receives can affect the color of its leaves. The money tree grown in bright light will have more vibrant, deep green leaves, while the foliage of those grown in lower light conditions may have a lighter, yellow-green color.  

When grown outdoors, the jade plant thrives best in full sun to partial shade, for at least six hours of strong light each day to survive. However, partial shade in the afternoon is often preferable - especially in hotter climates where the plant might become stressed by the intense heat of the afternoon sun.  

The red coloration on the margins of the leaves of a Jade plant is a sign of stress; it's usually not harmful to the plant and will often disappear once the plant is returned to the bright sunlight.  

Optimal Soil & Fertilizer Needs 

The Botany Bay jade plant prefers sandy, well-drained soil and should be fertilized once a year in the spring. Planet Desert specializes in succulents and has specialized succulent potting soil that includes an organic substrate with mycorrhizae to help with the growth of a healthy root system to help your new plants and succulents thrive. 

When it comes to fertilizing your Crassula ovata, it only needs a small amount of fertilizer applied once a year in spring. Succulent plants prefer a fertilizer with lower doses of NPK, with a maximum ratio of 5-10-5, higher in phosphorus than nitrogen.

Hardiness Zone & More

In the United States, this Botany Bay Jade Plant is mostly an indoor plant, but if you live in southern Florida or Hawaii, then you can cultivate it outdoors in USDA zones 9-11.

The jade plant, on the other hand, cannot handle frost, cold, or freezing temperatures, so make sure it doesn't get below 45 degrees F in its environment. 

As desert dwellers, the jade plant enjoys hot temperatures and high humidity, but can tolerate lower humidity as well. They prefer constant temperatures above 70 degrees Fahrenheit and can tolerate triple digits in the summer, so don't worry if your succulents get too hot.

In terms of coloration, Jade plants can display different colors depending on the temperature. When the plants are exposed to cooler temperatures, the leaves may turn reddish or purplish in color. This reddish tint on smooth, fleshy leaves is a natural response to cooler temperatures and is not harmful to the plant.

How to Grow Best Botany Bay Jade Plant Indoors 

Botany Bay Jade plants thrive in temperatures between 65-75°F during the day and slightly cooler temperatures at night. Make sure to place them in a bright, indirect light location to encourage healthy growth. Avoid overwatering by allowing the soil to dry out between waterings to prevent root rot.

Wildlife - Jade Plant Flowers Attract the Following Friendly Pollinators

Jade plant flowers are known to attract a variety of friendly pollinators, including bees, butterflies, and hummingbirds. These creatures are drawn to the sweet nectar and vibrant colors of the flowers, helping to facilitate pollination and promote the growth of new plants. Additionally, the presence of these pollinators can contribute to a healthy ecosystem and biodiversity in the surrounding area.

Butterflies
Bees
Hummingbirds
Lady Bugs
Multi Pollinators
Other Birds

According to ASPCA, the Crassula ovata 'Botany Bay' jade plant is considered mildly toxic to pets and humans. However, it is safe to touch and handle, making it a popular choice for indoor houseplants.

How to Propagate Your Crassula ovata 'Botany Bay' Jade Plant

To propagate your Crassula ovata 'Botany Bay' Jade Plant, you can take stem cuttings from a healthy, mature plant. Make sure the cutting is at least 3-4 inches long and allow it to dry for a few days before planting it in well-draining soil. Water sparingly until roots develop, then gradually increase watering as the plant establishes itself.

Key Takeaways

  1. Botany Bay Jade has a compact, upright growth habit, forming dense clusters of fleshy green leaves with reddish edges in bright light.
  2. This variety is considered a symbol of prosperity and good luck, often used as a Feng Shui “money plant” in homes and offices.
  3. It is highly drought-tolerant, storing water in its thick leaves and requiring only infrequent watering.
  4. The plant responds well to pruning and shaping, making it a popular choice for bonsai-style training and container displays.
  5. Its low-maintenance nature and attractive form make it an excellent choice for beginners or busy plant lovers.

The Bottom Line

Overall, the Botany Bay Jade Plant is a resilient, slow-growing succulent prized for its compact shape and dense clusters of bright green, fleshy leaves that often develop red margins in full sun. Its tidy growth habit makes it ideal for containers, small spaces, or bonsai training. With its drought tolerance, low-maintenance needs, and ornamental appeal, Botany Bay is a reliable and attractive choice for both beginner and experienced plant owners looking to add a touch of structure and vibrant greenery to their indoor collection.

Shipping Notes
  • Free Standard Shipping on $100+ Orders to the USA.
  • Except Preorder products are shipped in 48 hours.
  • Delivery to the USA:
  1. Standard Shipping : 3-10 business days
  • If time is of the essence, please consider selecting expedited delivery for faster service.
Exchange/Return Notes
  • We offer a 30-day return/exchange service after receiving.
  • Final sale items are not eligible for returns or exchanges.
  • To process your return/exchange, please contact us at [email protected]
  • Please click here for more details>>> Return & Exchange Policy
SKU: 27854190245

Discover Niche Categories That Outsell jade & co succulent boutique llc

Top-Converting Item to Boost Your Average Order

4.8 ★★★★★
Based on 26 reviews
Sort
Highest Rating
Newest First
Oldest First
Product Reviews
M
Verified Purchase
morey smith
Grantham, US
★★★★★ 5
Easy to apply.
Size: 4 Oz
Product did a great job renewing my plastic house shutters. It brought back the deep rich color and made them look better the new.
WAS THIS REVIEW HELPFUL?YesReportShare
Reviewed in the United States on May 27, 2026
S
Verified Purchase
Stuart R. Stengel
New York, US
★★★★★ 5
Great Stuff
Size: 120 ML
Product is good, Easy to spread for the most part. The only complaint I would give it is that the applicators do not hole up after several applications, I would suggest using a microfiber cloth to apply.
WAS THIS REVIEW HELPFUL?YesReportShare
Reviewed in the United States on June 1, 2026
T
Teresa Wilson
Dallas, US
★★★★★ 5
Restored My Trim Instantly
Size: 120 ML
I used this plastic restorer on the faded trim around my SUV, and the difference was immediate. The dull gray plastic turned back to a rich black color within minutes. It spreads evenly and doesn’t leave greasy streaks behind. After a few weeks and several rainy days, the finish still looks great. My car honestly looks years newer now.
WAS THIS REVIEW HELPFUL?YesReportShare
Reviewed in the United States on May 11, 2026
E
Verified Purchase
Eric J. Jenislawski
Lake Worth, US
★★★★★ 5
Great result, exceptional value, and easy, forgiving application.
Size: TRIM COAT KIT
I am thoroughly pleased with the results of this product, and the application was easier than I expected. Outstanding stuff. I am writing a longer review in case it helps people who are unsure about a "once and done" product that calls itself permanent. It's not hard to apply. It is forgiving and there's time to even it out. But here are some things to anticipate. My use case: I used Cerakote to restore the plastic trim on a used 2014 black Dodge Challenger that had been repainted but the plastic trim was original and it had been kept outside by the prior owner, so the contrast between the new paint and faded trim was noticeable. The trim was originally a deep, dark gray (it is never as black as the paint). It had faded to a medium-gray in many places: running boards on the side beneath the door, below the read bumper (which were also somewhat worn from debris), around the tail lights, and the plastic piece beneath the windshield wipers between the windshield and the hood. These were all looking weathered. The trim was very oxidized in some places, chalky grey near the hood and around the back bumper. The plastic around the tail lights also had light streaks in it from where water drains down from the trunk. What else I tried before I tried Cerakote: I got middling results from Mother's Back to Black. It looked somewhat better for a week or two, and then it went back to looking as before. Not impressed. I got a tip online to try rubbing the plastic trim with a melamine magic eraser, so I did that next, and this made a significant difference. Melamine is abrasive, so be careful if you do this on your trim. I went gently, up-and-down, side-to-side and in small circles, by hand, with gentle pressure like one would with a polishing compound. By removing the oxidation, the plastic was a few shades darker in the worst spots and the streaking on the rear tail light piece was gone. The rough spots on the trim at the bottom of the car and around the wheels looked somewhat better. But it certainly did not "like new." Cerakote experience: I decided to give Cerakote a try based on the video and good reviews. Bam! Back to factory-like deep dark gray. I wish I had taken pictures. It's incredible. Fully satisfied! I had already washed the trim with Dawn dish soap. I started with the trim bone dry. You are warned everywhere that water droplets will ruin the result, so don't expect to do this process right after you wash the car unless you like to live dangerously and have compressed air to spray cracks and crevices. I was worried that application would be streaky if I didn't do it right. Not so. It is forgiving. Here's what I learned. 1) The first 20% of what you'll get out of the packet goes on heavy with the lightest touch. One packet goes a long way. The next 60% is the "normal" application. This goes on the easiest. You can really milk the last drop out of each towelette, but I didn't because the last 20% of what you can get out of it by rubbing it really hard comes out very light and is not worth the uneven application unless you have some random area you don't care much about and want to use the remainder for that. I only used 5 packets to do the whole car. When you start a new packet, the beginning is where you might want to go back later and even it out once the application gets more normal. Or better, start a new packet on a big section to spread it around well and then move to smaller trim when the towelette is less fresh. 2) You've got time to work with it and make corrections. It stayed liquid like water for at least 20 minutes in my conditions: about 80 degrees, not very humid, indirect sunlight on an 80 degree car. Don't apply in direct sun or on a hot car. The product then gets sticky as it cures, but you can still work with it during the sticky time, rubbing it in and spreading it evenly with the towelette. I did not use a microfiber to "knock down" heavy spots. I just came back around with the towelette. I think a dry microfiber might pull off too much product. When it is half-cured, it is sticky and you can buff it with the towelette at this stage to further flatten and even things out. Work in sections, one piece of trim at a time. 3) Overlaps won't show as long as you rub it all in thoroughly. I tried the overlapping parallel passes method that they recommend, and this works pretty well. I was worried that I might get a "double heavy" streak where the passes overlap but this not so unless the towelette is fresh, but this is fixable. You can do a pretty natural, casual back-and-forth motion for the most part and it comes out fine. This is NOT a super-finicky product. I made a second or third back-and-forth pass in a few areas, and used circular motion in some places where the trim was textured or a little rough from wear, and it all looked even in the end. Just rub it down into the plastic and even out the sheen while it is uncured and it's good. 4) It cures like you see it when it's still wet. It doesn't lighten up very much as it cures. It just looks a little less wet. So get it right by eye when it is wet and that's pretty much what you will still have in an hour when it is cured. 5) Don't miss a spot! You'll see it for sure if you do because the different is so dramatic. And a "second coat" is not easy or recommended. This is the only once-and-done part that you want to get right, and you have plenty of cure time to be thorough. 6) Use the folded corner of the towelette to get into small corners and edges, like where the trim meets the paint or has an inside corner or some little nook. A fresh towelette is great for getting into small areas because a feather touch applies plenty of product when the towelette is fresh. The trim now looks amazing and I am entirely satisfied. I will use Cerakote on my other vehicles. The only minor con is a strong ammonia smell when you are up close to it while it is wet. No smell once it is cured. I would definitely wear the recommended gloves while applying. As others say, you will probably drop that towelette on the ground. It's slippery when wet. Keep it folded in quarters as it comes for ease of application. Turn to a new quarter once a side gets dirty or dry and fold it inside out for four more quarters to use. Bonus, but off-label -- at your own risk: The product is not intended for the soft rubber around the windows, but I tried it there too, and it looks amazing. All I did was wash the rubber with dish soap like the trim, and I rubbed it a few times with a wet microfiber cloth to get the superficial layer of oxidized rubber off. Then I applied Cerakote. It looks great. The rubber used to be blotchy and faded. The microfiber evened this out a little. I would not use melamine on the rubber -- this made it look worse in a test section. The Cerakote made it look great: jet black, much shiner, and much more even looking. Not quite "brand new" but far better than I thought possible. I thought I might need to replace the rubber. Now it's looking great next to the jet-black new paint. This afterthought use alone was worth the money. Can you apply a second coat the next day? They don't say you can, and I don't recommend it. This is meant to be one-shot, which is why you should check to make sure you don't miss any spots. I had two areas where I tried a second coat the next day. The first was on the plastic trim between the windshield and the hood. I didn't rub this trim much with melamine beforehand so there was a lighter area (light grey originally, the worst spot) that didn't get as black as the other sections so I did it again, which helped a little, but not much. I didn't wash this area with soap beforehand because I wasn't intending to fix it until I got going. Once you put things back to black you will start noticing other faded things more. Likewise, I did a second coat on the very top of the soft rubber at the bottom of the windows (the part which faces upward and thus gets the most sun), it wasn't as shiny as the other parts, so I went over that section gently again the next day with a fresh towelette. As soon as I did it, I thought it was a mistake. This didn't go well initially because the cured coating is very hydrophobic so the new, wet, Cerakote of the second coat goes on smooth initially and then "puddles up" into little droplets a few minutes later. It doesn't want to stick to the first coat. I thought I had messed it up, but I let it cure a little until the sticky phase, and spread it out again with the towelette. It stayed that time but gathered back a little into some streaks. I spread it once more a few minutes later and it looked good. It stayed even. It looks just fine a few days later, so I think it cured OK. I hope this product last for months as advertised. Even if it doesn't I would totally do it again because the results are superior, I still have half my towelettes left, and the product is not expensive. 10/10 would do again and will recommend to everyone.
WAS THIS REVIEW HELPFUL?YesReportShare
Reviewed in the United States on June 25, 2025
R
Verified Purchase
Robert Barger
Houston, US
★★★★★ 5
Easy to use, amazing results
Size: TRIM COAT KIT
This is an awesome product that is easy to use and has amazing results. My plastic trim never looked so good.
WAS THIS REVIEW HELPFUL?YesReportShare
Reviewed in the United States on May 14, 2026

recommand products