Pay in installments of $5.36 with
 ,
,
 and
and

Shipping Estimate
USA
- USA
- CAN
- USA
- CAN
Ships within 48 hours · Estimated delivery Sep 21 - Sep 26
 Promo Codes Available:
For Your Every Summer RSVP, with Code: SUMMER15
Description
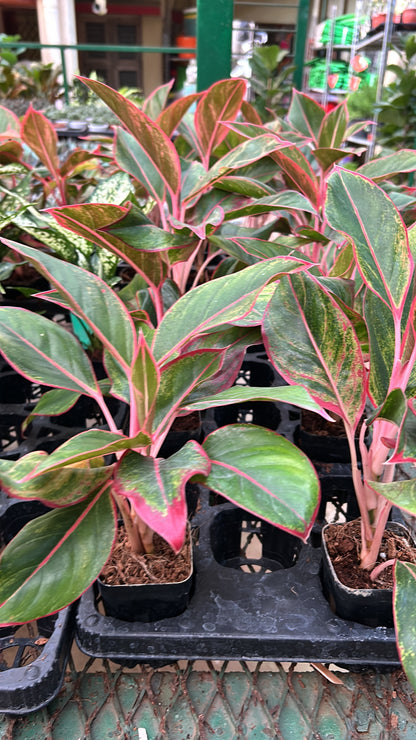
aglaonema lipstik Aglaonema Lipstick – Dream GreenAglonema Lipstick Product Specifications Pot Diameter: 4" Pot Height: 4" Plant Height above Pot: 6" 10" Growing Medium: Enriched Cocopith (Cocopith with NPK) Product Weight: 250 grams. Know your plant Aglaonema Lipstick Siam Aurora is a stunning cultivar of Aglaonema, known for its striking and colorful foliage. As the name suggests, its leaves display beautiful and vibrant hues reminiscent of an aurora. The foliage typically features shades of pink,
Aglonema Lipstick
Product Specifications
Pot Diameter: 4"
Pot Height: 4"
Plant Height above Pot: 6"-10"
Growing Medium: Enriched Cocopith (Cocopith with NPK)
Product Weight: 250 grams.
Know your plant
Aglaonema Lipstick/ Siam Aurora is a stunning cultivar of Aglaonema, known for its striking and colorful foliage. As the name suggests, its leaves display beautiful and vibrant hues reminiscent of an aurora. The foliage typically features shades of pink, red, green, and cream, creating a captivating and visually appealing display.
The unique and eye-catching appearance of Aglaonema Siam Aurora makes it a popular choice among indoor plant enthusiasts and collectors. It adds a pop of color and a touch of tropical elegance to any indoor space.
Caring for Aglaonema Siam Aurora is relatively straightforward and similar to other Aglaonema varieties:
1. **Light:** Provide bright, indirect light for the plant. Avoid placing it in direct sunlight, as this can cause leaf burn.
2. **Temperature:** Keep the plant in a warm environment with temperatures between 16 to 30 degree Celsius.
3. **Watering:** Allow the soil to partially dry out between waterings. Overwatering can lead to root rot, so it's essential to avoid keeping the soil constantly soggy.
4. **Humidity:** Aglaonema Siam Aurora prefers moderate to high humidity levels. If the air in your home is dry, consider using a humidifier or misting the plant occasionally.
5. **Soil:** Use well-draining soil formulated for houseplants or tropical plants.
6. **Fertilizer:** During the active growing season (spring and summer), you can fertilize the plant with a balanced, water-soluble fertilizer every 4-6 weeks. Reduce or stop fertilizing during the winter months.
7. **Pruning:** Trim off any yellow or brown leaves to maintain the plant's appearance and overall health.
With proper care, your Aglaonema Siam Aurora can continue to showcase its beautiful foliage and thrive as an elegant and charming addition to your indoor space.
Benefits
Aglaonema Siam Aurora, like other varieties of Aglaonema, offers several benefits as an indoor plant. Here are some of the key advantages of having Aglaonema Siam Aurora in your home or workspace:
1. **Air Purification:** Aglaonema Siam Aurora is an air-purifying plant that helps improve indoor air quality by removing pollutants such as formaldehyde, benzene, and other toxins. Its presence can contribute to a healthier and more breathable living environment.
2. **Aesthetic Appeal:** The vibrant and colorful foliage of Aglaonema Siam Aurora adds a decorative touch to any indoor space. The striking pink, red, green, and cream hues create a visually appealing display that can enhance the overall aesthetics of your home or office.
3. **Low Maintenance:** Aglaonema Siam Aurora is relatively low-maintenance and easy to care for. It is tolerant of occasional neglect and can thrive in various indoor conditions, making it an excellent choice for busy individuals or those new to plant care.
4. **Adaptability:** This plant can tolerate different light levels, from bright indirect light to moderate low light, making it versatile and adaptable to various indoor spaces.
5. **Reduced Stress:** Studies have shown that spending time around plants can reduce stress and promote a sense of calm. Having Aglaonema Siam Aurora in your living or working space can contribute to a more relaxed and positive atmosphere.
6. **Improved Focus and Productivity:** Indoor plants, including Aglaonema Siam Aurora, have been linked to improved focus and productivity. Having greenery around can enhance mental clarity and cognitive function.
7. **Natural Décor:** Aglaonema Siam Aurora serves as a living decoration that can be used to brighten up corners, shelves, or tables. Its unique foliage makes it an excellent choice for adding a touch of nature to your interior design.
8. **Easy Propagation:** Aglaonema Siam Aurora can produce offsets or "pups" that can be propagated to grow new plants. This ease of propagation allows you to expand your plant collection or share plants with friends and family.
Overall, Aglaonema Siam Aurora is a beautiful and beneficial indoor plant that not only enhances the visual appeal of your living space but also contributes to better air quality and a more enjoyable environment.
Tips
Maintaining Aglaonema Siam Aurora is relatively simple, and following these tips will help ensure your plant stays healthy and vibrant:
1. **Light:** Place your Aglaonema Siam Aurora in bright, indirect light. Avoid direct sunlight, as it can scorch the leaves. Too little light may result in less vibrant colors, so find a spot with moderate to bright, filtered light.
2. **Temperature:** Aglaonema Siam Aurora prefers temperatures between 16°C to 30°C. Avoid placing the plant in areas with extreme temperature fluctuations or cold drafts.
3. **Watering:** Allow the top inch of the soil to dry out before watering. Overwatering can lead to root rot, so it's essential to avoid keeping the soil constantly soggy. During winter or cooler months, reduce watering frequency.
4. **Humidity:** While Aglaonema Siam Aurora can tolerate average indoor humidity levels, it appreciates higher humidity. Consider misting the leaves occasionally or using a humidity tray to maintain suitable moisture levels.
5. **Soil:** Use well-draining soil formulated for succulents or tropical plants. The soil should allow excess water to escape easily to prevent waterlogged roots.
6. **Fertilizer:** Feed your Aglaonema Siam Aurora with a balanced, water-soluble fertilizer during the growing season (spring and summer) every 4-6 weeks. Reduce or stop fertilizing during the dormant winter months.
7. **Pruning:** Trim off any yellow or brown leaves at the base to maintain the plant's appearance and overall health. Regular pruning will encourage new growth.
8. **Pest Management:** Inspect your plant regularly for pests like spider mites, mealybugs, or scale insects. If you spot any, isolate the plant and treat it with appropriate measures, such as using insecticidal soap or neem oil.
9. **Repotting:** Aglaonema Siam Aurora prefers slightly root-bound conditions. Repot only when the plant has outgrown its current container, typically every two to three years.
10. **Avoid Cold Drafts:** Ensure your plant is protected from cold drafts and sudden temperature changes, as they can stress the plant and lead to leaf problems.
By following these care tips and adjusting them based on your specific indoor environment, you can enjoy a healthy and vibrant Aglaonema Siam Aurora as a beautiful addition to your living or working space.
Common Problems and Solutions:
Aglaonema Siam Aurora is a beautiful and popular cultivar of Aglaonema, but like any plant, it may face certain issues. Here are some common problems that can occur with Aglaonema Siam Aurora and how to address them:
1. **Yellowing Leaves:** Yellowing leaves can be a sign of overwatering or underwatering. Ensure you are following a proper watering schedule and allowing the top inch of soil to dry out between waterings. Also, check for proper drainage to avoid waterlogged roots.
2. **Brown Leaf Tips:** Brown leaf tips can be caused by dry air or inconsistent watering. Increase humidity levels around the plant by misting the leaves or using a humidity tray. Make sure you are watering consistently and providing enough water without overdoing it.
3. **Pest Infestations:** Aglaonema can be susceptible to pests like spider mites, mealybugs, and scale insects. Regularly inspect your plant for any signs of pests, and if detected, isolate the affected plant and treat it promptly with appropriate insecticidal solutions.
4. **Leaf Curling:** Curling leaves can be a response to low humidity or cold drafts. Ensure the plant is in a location with consistent temperature and humidity levels, and avoid exposing it to cold drafts.
5. **Leaf Spots or Browning:** Leaf spots or browning can be caused by fungal or bacterial diseases. Avoid overhead watering, as wet leaves can encourage disease development. Ensure good air circulation around the plant, and promptly remove any affected leaves to prevent further spread.
6. **Loss of Variegation:** If your Aglaonema Siam Aurora starts to lose its vibrant colors and variegation, it may indicate insufficient light. Move the plant to a location with brighter, indirect light to encourage better coloration.
7. **Leggy Growth:** Leggy growth can occur if the plant is not getting enough light. Move the plant to a brighter location to promote more compact and healthy growth.
8. **Root Rot:** Root rot can occur if the plant is overwatered or if it sits in waterlogged soil. Ensure the plant is in well-draining soil and avoid overwatering to prevent root rot.
Regularly inspect your Aglaonema Siam Aurora for any signs of problems and address them promptly to keep your plant healthy and thriving. Providing the right light, water, and care will help minimize these issues and ensure your plant remains a beautiful and vibrant addition to your indoor space.
HAPPY PLANT PARENTING!!
Disclaimer: Actual plant may have slight variations from what is shown in the image since each individual plant has its own appearance.
Shipping Notes
- Free Standard Shipping on $100+ Orders to the USA.
- Except Preorder products are shipped in 48 hours.
- Delivery to the USA:
- Standard Shipping : 3-10 business days
- If time is of the essence, please consider selecting expedited delivery for faster service.
Exchange/Return Notes
- We offer a 30-day return/exchange service after receiving.
- Final sale items are not eligible for returns or exchanges.
- To process your return/exchange, please contact us at [email protected]
- Please click here for more details>>> Return & Exchange Policy