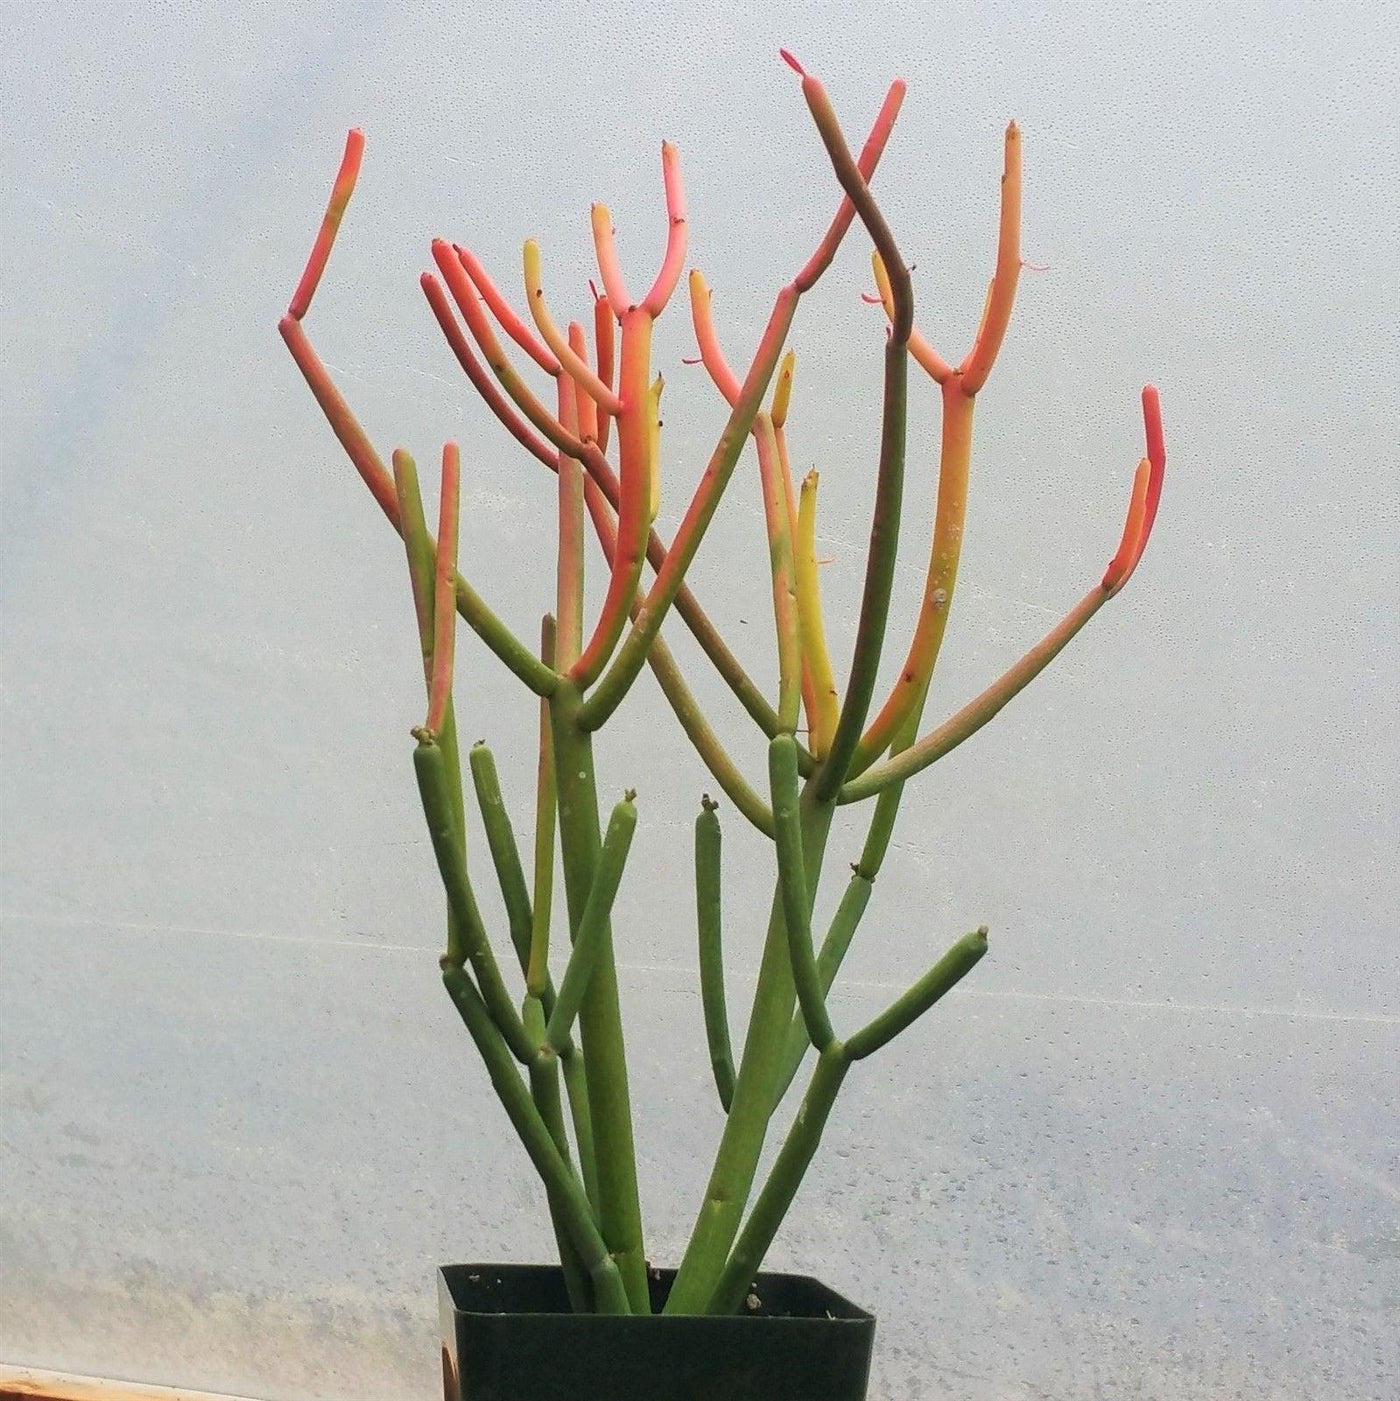
SKU: 92182164689
fire pencil cactus

fire pencil cactus Pencil Cactus

Sale price$18.14 Regular price$20.16
Save 10%

Pay in installments of $5.04 with ShopPay, AfterPay and Klarna

Shipping Estimate
USA
  • USA
  • CAN

Ships within 48 hours · Estimated delivery Sep 3 - Sep 8

Promo Codes Available:

For Your Every Summer RSVP, with Code: SUMMER15

Description

fire pencil cactus Pencil CactusIntroducing the Pencil Cactus, botanically known as Euphorbia tirucalli Fire Sticks (also called Sticks on Fire), a striking succulent prized for its sea coral like appearance and vibrant, loosely branching pencil thin stems that develop brilliant shades of green, orange, and red. Native to Southern Africa, this unique succulent belongs to the Euphorbiaceae (spurge) family, not the cactus family (Cactaceae), though it is commonly referred to as Pencil

Introducing the Pencil Cactus, botanically known as Euphorbia tirucalli ‘Fire Sticks’ (also called Sticks on Fire), a striking succulent prized for its sea coral-like appearance and vibrant, loosely branching pencil-thin stems that develop brilliant shades of green, orange, and red.

Native to Southern Africa, this unique succulent belongs to the Euphorbiaceae (spurge) family, not the cactus family (Cactaceae), though it is commonly referred to as “Pencil Cactus” because of its cactus-like form and upright growth habit. It is also known by several other common names, including fire sticks plant, sticks on fire succulent, fire plant, red pencil tree, milk bush, and Euphorbia tirucalli ‘Rosea’.


When exposed to direct sunlight, the tips turn red, which is why they are also called firesticks.

This fast growing evergreen succulent can grow up to 30 feet tall and 10 feet wide, forming a thicket of brilliantly colored vertical stems with loose branches.

The unusual stems of this firestick plant, which are as thin as pencils, have a reddish-golden hue that becomes yellow in the summer and red again in the winter.

The pencil cactus flowers boast vibrant yellow, pink, or orange blooms in the summer and spring, making them a true showstopper in any garden.

The pencil cactus is extremely drought tolerant and hard to kill, and as a result, is a great, low-maintenance, easy-care plant for your home or garden.

You can grow your pencil cactus indoors year-round as a houseplant. If planting outdoors, it's best to do so in the spring when temperatures are warm and stable. This cactus grows faster than many other cacti, making it a striking addition to your garden or home.

If you cut your pencil cactus, be careful—the thick, white sap is toxic and can cause skin irritation, burns, or severe eye irritation if it gets into your eyes. While highly irritating, some cultures have historically used it in traditional medicine for treating growths like warts and tumors, though it is not safe for home remedies. Always wear gloves when handling the plant and wash your hands thoroughly if you come into contact with the sap.

When and How to Water Your Pencil Cactus 

This pencil cactus firestick plant can withstand droughts and doesn't need to be watered frequently to survive. Watering these perennial succulents should be done every 3–4 weeks or when the soil feels dry. Let the soil completely dry out between waterings, and if in doubt, give your fire plant a little more time before watering again.  Less water is needed for humid locations and indoor spaces. Pay attention to how the pencil cactus looks and adjust the watering accordingly.

Remember that succulents in the desert can go for weeks or even months without water, so water them sparingly during their rest phase and moderately during their active growing season.

Pro Tip

Most people like to see the red tips that give this Euphorbia tirucalli its firestick name. Note that it is stress that causes the tips to go red. So, the art is to stress the firestick plant a bit, but not too much. So, give it a lot of light and water it less than other succulents, so it is thirsty but not dying of thirst.

Overwatering can also cause the Euphorbia tirucalli 'Firesticks' tips to turn red, but it can also lead to root rot and other problems. So, if your pencil cactus is not turning red in full sun, it's possible that it's not experiencing enough stress to produce the anthocyanin pigments or that it's receiving too much water.

Light Requirements - Where to Place Your Pencil Cactus 

Like most succulents, indoors, the Euphorbia tirucalli firesticks need bright, indirect sunlight to thrive, so choose the brightest area in the house.

Potted indoor pencil cacti require four hours of direct sunlight, which can be achieved by locating them on a sunny south or west-facing windowsill. 

If you are growing these firestick succulents outdoors, make sure that they receive at least six hours of direct sunlight per day.

Partial shade may be tolerated as long as your pencil cactus gets the majority of the sunlight that it needs when it's planted outside. This succulent plant won't thrive if left in the shade for a long time. Its colors become more vibrant the more sunlight it receives.

In order to avoid sunburn, it is preferable to acclimatize your pencil cactus first before moving it outdoors or increasing the amount of sunlight it receives.

Optimal Soil & Fertilizer Needs 

The firestick Euphorbia is a succulent plant that likes very airy, porous, nutrient-rich soil with a pH of 5.5–6.5. Succulents require fast-draining soil that dries completely between waterings. Ideally, you want to use our specialized potting mixGo to soil cactus mix blend 1 gal 4 qt cacti succulent dirt compost growing media that contains 5 natural substrates and organic mycorrhizae to promote the development of a strong root system that helps your Euphorbia firesticks Pencil Cactus to thrive. 

When it comes to fertilizing your pencil cactus plant, it only needs a small amount of fertilizer applied once a year in spring. Cacti prefer a fertilizer with lower doses of NPK, with a maximum ratio of 5-10-5 that is higher in phosphorus than nitrogen.

Hardiness Zones & More 

When growing indoors as a houseplant, the Euphorbia firestick can tolerate temperatures between 65 °F and 75 °F. Your Euphorbia firestick plant performs well in temperatures above 30 °F. However, it can withstand temperatures below that, but only for short periods of time.

In the United States, the Euphorbia tirucalli is mostly an indoor plant, but if you live in southern Florida or Hawaii then you can cultivate it outdoors in USDA zones 10 -11.

Growing these pencil cacti in containers is the best option if you live in an area with harsh winters.

By doing this, you can bring your Pencil Cactus indoors during the winter or any time there's a chance of frost or snow. Normal house humidity is fine for this Euphorbia, but it prefers dry conditions. 

Wildlife - Euphorbia tirucalli Attracts the Following Friendly Pollinators

The Euphorbia tirucalli flowers attract a variety of pollinators, such as bees, butterflies, and hummingbirds, with their bright colors and sweet nectar. These pollinators play a crucial role in the ecosystem by helping to fertilize plants and promote biodiversity.

Butterflies
Bees
Hummingbirds
Lady Bugs
Multi Pollinators
Other Birds

According to ASPCA, the Euphorbia tirucalli 'Firesticks' is mildly toxic to humans and pets. It can irritate the skin, eyes, and gastrointestinal tract. However, it is safe to touch as long as precautions are taken to avoid contact with the sap. Wear gloves when handling this plant to prevent any potential skin irritation.

How to Propagate Your Pencil Cactus

When it comes to pencil cactus propagation, one common method is through stem cuttings. Simply take a cutting from a healthy pencil cactus, let it dry for a few days, and then place it in well-draining soil. Another method is through division, where you carefully separate the offsets or side shoots from the main plant and plant them individually.

Key Takeaways

  1. The stems of firesticks are as thin as pencils (hence the name) and turn a fire-red in the winter.
  2. Euphorbia Firesticks is a stunning variety that changes color with the seasons, turning bright red or orange tips in cooler temperatures or full sun.
  3. This succulent has a rapid growth rate, reaching up to 30 feet tall when grown outdoors, with a branching, upright form.
  4. During the spring and summer, the yellow flowers bloom in clusters on the end of the branch, usually for just a few days.

The Bottom Line

Overall, the pencil cactus (Euphorbia Firesticks) is a unique and striking succulent plant that adds a touch of elegance to any space. With its slender, pencil-like stems and vibrant green color, this sticks-on-fire cactus can truly be a showstopper. However, it's important to remember that the pencil cactus is not a true cactus but rather a succulent. It requires minimal care, preferring bright light and well-draining soil. By providing proper pencil cactus care, you'll have a beautiful and unique Euphorbia firestick plant that will thrive for years to come. 

Shipping Notes
  • Free Standard Shipping on $100+ Orders to the USA.
  • Except Preorder products are shipped in 48 hours.
  • Delivery to the USA:
  1. Standard Shipping : 3-10 business days
  • If time is of the essence, please consider selecting expedited delivery for faster service.
Exchange/Return Notes
  • We offer a 30-day return/exchange service after receiving.
  • Final sale items are not eligible for returns or exchanges.
  • To process your return/exchange, please contact us at [email protected]
  • Please click here for more details>>> Return & Exchange Policy
SKU: 92182164689

Discover Niche Categories That Outsell fire pencil cactus

Top-Converting Item to Boost Your Average Order

4.5 ★★★★★
Based on 6 reviews
Sort
Highest Rating
Newest First
Oldest First
Product Reviews
T
Verified Purchase
Talagand
Dallas, US
★★★★★ 4
Reasonably adequate room divider
Size: 4 Panel-88'', Color: Beige
I'm reviewing this as I assemble it. Couple things: 1. I didn't expect as much assembly. I've ordered dividers before and they more-or-less came as one unit. Sometimes the panels needed screwing together. These require complete assembly and come largely as three rods: two make up vertical columns and snap together. Another one (called part "C") makes the horizontal columns and you have two of these per panel (one attaches to part "A" and the other part "B"). These parts are metal with a plastic shim. Using the wood screws to attach to part "C" is a real pain in the neck. There's not much holding the panel in place so it's a little tricky. One tactic I've found while I'm assembling that works for the initial connections from parts A and B to their respective "C" rods is to hold the screw in place with a screw driver and then rotating the rod around the screw. This will do a number on your hands if you aren't wearing gloves. This obviously doesn't work when completing the connection. Using a driller driver on this is really near impossible because there isn't anything you can use to secure it in place. You can use it on the first panel, but as it gets longer, it becomes increasingly difficult and because it isn't wood, it's really tight. I considered drilling larger pilot holes but since there are only 4x4=16 screws I need to screw in, I just decided to use my screw driver to complete it. 2. Also related to assembly. When completing the panels (attaching parts "A" and "B" to parts "C" that have the cloth cover on it), you have to be careful that when you tighten that side that it isn't loosening the other side. Because the pilot holes are so tight, you can end up rotating the rod, which rotates it in the same direction as looser on the original side. Having someone hold the "C" rod in place while you screw it in is probably the easiest approach. I didn't have a 2nd person, so I just had to keep flipping back and forth and tightening both sides as I screwed it in. Not the worlds biggest deal, but annoying nonetheless. 3. The way the instructions are written, they seem to suggest building this thing progressively; that is, you do panel 1, then 2, connect them together, then do 3 and connect it, etc. I took a different route that I suspect saved me quite a bit of trouble, and I assembled all four panels first and THEN connected everything together. 4. For the love of God make sure you check that the plastic tip is on the same side for every panel. Otherwise, you have to take one side apart again and reverse it. On the bright side, if this happens, you've essentially bored out the pilot holes to be the correct size... which is having me question if I shouldn't have just bored them out to the appropriate width in the first place. 5. Attaching all of the panels together is also an enormous pain in the ass unless you happen to have an 88" long elevated surface. Attaching the legs either requires you to elevate one side, which will invariably twist the inexplicably cheap material in the bottom connectors... or you can attach them sideways... or you can put this thing upright, having two people hold the panels in place while you use the allen wrench to tighten the bolts on the underside. None of those are particularly great options. NOW on to the utility itself. 1. The panels do let some light through (I didn't believe their advertising, and that was one of the reasons that I bought beige, is that I wanted it to not be too dark). They aren't transparent though, so it isn't that far off from their description. They functionally work great, and keep the mess of wires hidden and when I'm sitting at my desk, actually reflect quite a bit of light into my office. Great! 2. My wife has described these as "the most hideous piece of furniture ever conceived of by man." So it does not have spouse approval factor. Granted, she will seldom be in my office area, so that isn't the end of the world. 3. These are really hard to align in a way that doesn't look a little tacky. There are some plastic connectors but they don't do a bang up job of keeping these in place. Each panel is slightly tilted and it's... quite obvious. I may at some point make my own improvements to these to help make them more level. It's not a particularly expensive product so I wasn't expecting much so it's fine and I'm not going to ding them on the rating because of it. All said, would I buy this product again? Probably not. It's assembly was ~90 minutes which is about 75 minutes longer than I was anticipating spending on this (not including the 5 minute writeup that I'm doing here). But am I going to return it? Also no, if for no other reason I'd be just as annoyed taking it apart and putting it in the original box to return it.
WAS THIS REVIEW HELPFUL?YesReportShare
Reviewed in the United States on October 31, 2023
M
Verified Purchase
Mike
Chelsea, US
★★★★★ 5
Works For Desired Use
Color: Black, Size: 4 Panel-136‘’W-Round Pad
I recently purchased the Room Divider 6FT Folding Privacy Screens, 4 Panel Partition Room Dividers, and I must say, it has transformed the way I use my living space. The four-panel design is both elegant and functional, providing instant privacy without feeling bulky or overwhelming in my room. Setting it up was a breeze; the folding mechanism is smooth, allowing me to adjust the configuration as needed—straight, angled, or zigzag. I particularly appreciate the sturdy build; the panels feel solid yet lightweight, making it easy to move around when I want to reconfigure my space. Aesthetically, it’s a great addition. The neutral finish blends well with my décor, and the simple design doesn’t draw too much attention while still offering a sense of separation. It’s perfect for creating a temporary office corner, dividing a studio apartment, or even using it as a backdrop for online meetings. If I had to point out a minor downside, it would be that the divider isn’t completely soundproof—so conversations can still carry through—but for visual privacy and space management, it’s excellent. Overall, I’m extremely satisfied and would recommend it to anyone looking for a versatile and stylish room divider.
WAS THIS REVIEW HELPFUL?YesReportShare
Reviewed in the United States on February 24, 2026
A
Verified Purchase
Ansley
Dallas, US
★★★★★ 5
True to size & Use a Drill
Color: Beige, Size: 3 Panel-102‘’-Round Pad, Color: Beige, Size: 3 Panel-102‘’-Round Pad
Love this! Works perfectly for where I wanted it. I did measure my room incorrectly and thought it would be smaller, thankfully it’s not and thankfully it’s not bigger than the room itself. I did like how the whole thing was move-able but it was a bit annoying so I just added extra clips to the left of the middle one and unscrewed the right of the middle at the bottom so it opens like a door, this did make it a bit flimsy but duck taping it to the wall as anchor it works. 100% recommend, but do suggest a drill and a second set of hands to put it together, due to its size it can be a bit difficult to maneuver putting together yourself. Also if you have a clingy cat like I do, and think this will help keep them out, no, my cat who is very large can manage to squeeze underneath it.
WAS THIS REVIEW HELPFUL?YesReportShare
Reviewed in the United States on March 9, 2024
S
Verified Purchase
Sam
Charlottesville, US
★★★★★ 1
waste of money
Color: Black, Size: 4 Panel-136‘’W-Round Pad
This is a total waste of money. Its only going to free stand if you arent moving it. If you are planning on dividing a room, and then folding these for space and then dividing the room again, itll last a few days. The poles kept coming off of the screws that holds the fabric on the poles together. Was fixing this EVERY DAY. Finally got tired of doing this and just threw it out. Lot of money spent on garbage. Get a sheet room divider, or something that isnt cheaply made. Was simply making an office type space in a bedroom, to seperate the two areas for work, and folding it kept making the poles come off those twisted screws. just not worth it.
WAS THIS REVIEW HELPFUL?YesReportShare
Reviewed in the United States on May 3, 2026
A
Verified Purchase
Alysha H.
Carnegie, US
★★★★★ 5
Absolutely love this room divider!
Color: Beige, Size: 3 Panel-102‘’-Round Pad, Color: Beige, Size: 3 Panel-102‘’-Round Pad
When they say you can't see anything through it, they are correct. As you can see by the video, the cars are traveling by with the sunlight on the divider and you still can't see any cars passing nor can you see the ones in the parking lot. You can also tell it blocks out the sunlight too which is a definite plus for our store. Quality material on the divider. Material is nice and snug on the poles with no ripples. I also like the base of these, they make the divider nice and sturdy and can be adjusted if floor is uneven. Also the design of the legs allow them to go under your furniture. Also putting them together is pretty easy. Just make sure you when you are putting the poles together to make sure at the top of the pole that the indent screw hole faces out. This makes for a better look. The directions don't say which way to turn and at 1st, I had one, one way and the other was another way as both ways work that way but I wanted a uniform/better look.
WAS THIS REVIEW HELPFUL?YesReportShare
Reviewed in the United States on July 29, 2024

recommand products