Pay in installments of $5.42 with
 ,
,
 and
and

Shipping Estimate
USA
- USA
- CAN
- USA
- CAN
Ships within 48 hours · Estimated delivery Oct 11 - Oct 16
 Promo Codes Available:
For Your Every Summer RSVP, with Code: SUMMER15
Description
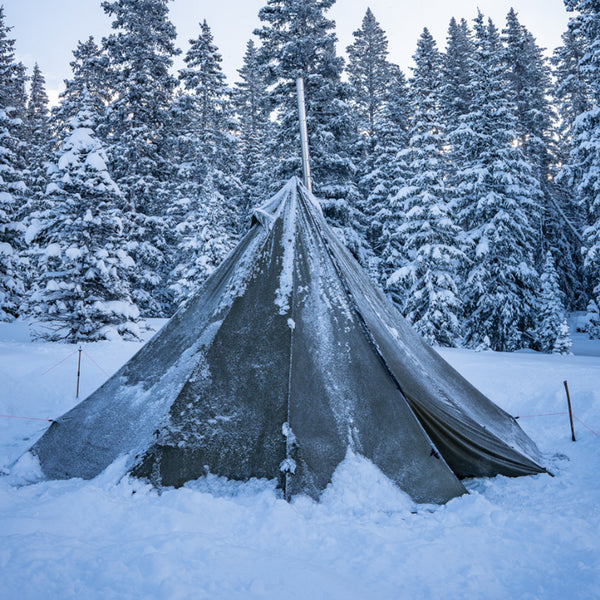
hot tipi tent Seek Outside 12 Person Tipi | Stove | Liner6 12 Person Tipi Stove Liner Hot Tent Bundle OVERVIEW: Ideal for a variety of outdoor enthusiasts, from horse packers and fly in campers to river and car campers, our 12 Person Hot Tent Bundle is tailored to meet your needs. It combines the comfort of a large tent and stove without the setup hassle of a traditional wall tent, making it versatile for group or solo use. Key Features: Spacious 12 Man Tipi in Olive Green Packable XL or Big Mama Titanium
6 - 12 Person Tipi | Stove | Liner | Hot Tent Bundle
OVERVIEW:
Ideal for a variety of outdoor enthusiasts, from horse packers and fly-in campers to river and car campers, our 12-Person Hot Tent Bundle is tailored to meet your needs. It combines the comfort of a large tent and stove without the setup hassle of a traditional wall tent, making it versatile for group or solo use.
Key Features:
- Spacious 12-Man Tipi in Olive Green
- Packable XL or Big Mama Titanium Stove (with 10.5 ft of pipe)
- Half Liner for added insulation and comfort
Easy to set up and compact for transport, even on horseback, this bundle provides flexibility in sleeping arrangements, accommodating 12 people or 6 with gear and a stove. For added comfort, it can sleep 4 or more on cots.
The Half Liner acts as a practical barrier, turning one side into a double-wall shelter. For complete double-wall insulation, you can add another liner. Made from lightweight, breathable, water-repellent fabric, the liner prevents frost and condensation, ensuring a dry and cozy interior.
We use premium fabrics and materials in all our products, crafted by our skilled in-house experts and backed by a lifetime manufacturer’s warranty.
Handmade in Grand Junction, CO (Made in USA)
- Sleeps 12 without stove
- Sleeps 6 with stove
SPORT BUNDLE INCLUDES:
- 12 Person Tipi, Green, With Door Screens
- XL Titanium Box Stove
- 10.5' Titanium Stove Pipe
- One Half Liner
- Aluminum Pole
SIZE GUIDE:
- Sleeps 12 without stove
- Sleeps 6 with stove
- Sleeps 4 standard cots with a stove
- Need one size smaller? See the 8 Person Bundle
- Need one size bigger? See the 16 Person Tipi
WARRANTY:
Defects in manufacturing and material for the practical lifetime of the product. Damage due to wear and tear or misuse will be repaired for a reasonable charge.
Specifications
SPECIFICATIONS:
Weight:
- Complete with XL Stove - 265 oz / 17 lbs 12 oz
- Complete with Big Mama Stove - 265 oz / 19 lbs 7 oz
Tipi Weight:
-
Canopy - 99 oz / 6 lb 3 oz
Tipi Dimensions:
- Height 9' 6"
- Diameter 18' 10"
- 260 sq ft
- Sitting Room (Area taller than 36") - 120 sqft
- Standing Room (Area taller than 6 ft) - 61 sqft
Stove Weights
- XL - Complete with damper, legs, hardware, and storage bag is 50 oz / 3 lb 2 oz
- Big Mama - Complete with damper, legs, hardware, baffle, and storage bag is 77oz / 4 lb 13 oz
- Stove Pipe - 2 oz / foot - 10.5 ft = 21 oz
MATERIALS:
Tent Fabric
- 30 Denier Cordura Spec Nylon 6.6 Ripstop
- 3000 mm hydrostatic head
- 33% more abrasion resistant than nylon 6
- Ripstop woven, Silicone coated
Stove Jack
- Silicone-coated Fiberglass
- 3,000 f melting point
- Tear and heat resistant material
Peak Cone
- VX42 Xpac, Dyneema
- 2 layered fabrics for extreme tear strength
- Fray and Abrasion Resistant
Comes With
COMES WITH:
Stove
- XL or Big Mama Titanium Wood Stove.
- 10.5 feet of roll up stovepipe
- Pipe rings
- Damper
- Spark Arrestor
- Intake Control
- Storage Bag
Twelve Person Tipi
- Shelter canopy
- Stove jack with rain flap
- Aluminum Pole - 6 sections
- 12 twisted stakes and 12 standard stakes.
- Enough seam sealer to seal the shelter.
- Stuff Sacks
Half Liner
- Liners turn half the shelter into a double wall tent, eliminating condensation drips.
- Add a second liner and line the entire shelter, except the area under the doors.
Instructions
Instructions
PITCHING:
- For detailed pitching instructions please read our detailed Pitch Instructions below:
How to Pitch a Tipi
How to put up a teepee
We’ll cover two pitch methods – Radius & Setback. These two methods arrive at the same answer, but solve the problem from opposite directions.
The keys to pitching are:
- Good site selection.
- Pick your sleeping area – this determines pole location & stove location if you’re using one.
- Door location & orientation
- Correct diameter (footprint)
After you make decisions on sleeping area and door orientation, it’s time to pitch. Getting a good pitch requires the correct size footprint. A footprint too big results in a bell shape that reduces usable space. A footprint too small leaves slack and runs the risk of running out of pole length.
Both of these pitching methods are designed to start out with the right tipi diameter between the two doors.
Use the following chart to determine your radius or setback.
|
Tipi Size |
4 Person |
6 Person |
8 Person |
12 Person |
16 Person |
|
Radius |
5' 11" |
7' |
7' 11" |
9' 5" |
10' 6" |
|
Zipper Setback |
28" |
36" |
46" |
54" |
62" |
|
Side Setback |
4" |
6" |
7" |
8" |
9" |
|
Height |
81" |
94" |
102" |
114" |
126" |
Radius Method
- Pick your sleeping area - this determines your pole location. (Pole location offset a few feet from sleeping area depending on size of shelter.)
- Set a stake to mark the pole location.
- From the center stake, either pull a pre-cut cord the length of your shelter’s radius, or mark your center pole at the radius length and use either of these to measure from the center stake to where you want your first door. Set a stake at this point.
- Go across the pitch area and pull another radius from the center stake in a straight line with the first two stakes. Set a third stake - this is your second door location.
- Hook both door stake loops on their stakes. Make sure the stove jack is oriented to the side you want if you're using a stove.
- Pull the fabric out taut but NOT stretched and set the remaining SEAM stake loops, working from door to door to door. Don't set stakes deep at this time as you may adjust after the tipi is raised.
- Very Important - stretch the fabric out, let it relax completely. This is taut. Stretching the fabric and setting stakes results in a bell shape that reduces usable space.
- If you're using a stove, make sure the stove jack flap is open. Open or close the vent as desired. (You can’t reach these once the tipi is up.)
- Put up the pole, adjust stakes if needed, fill in secondary stakes if needed, pound in all primary stakes.
Setback Method
- Set primary door stake.
- Grab opposite door stake loop and stretch tipi out taut (not stretched). Orient sleeping area or stove as needed.
- Setback the door using the measurement in the chart above. If you don’t have the measurement, put your hand on the door guyout, then fold the fabric toward the opposite door. The guyout is the middle of this fold. Where the stake loop lands is very close to the proper setback. (Setback is 2X distance from guyout to sod skirt below stake loop in door.)
- Set the seam stake loops next to doors first, then work door to door to door using side setbacks.
- The recommended setbacks are for a standard no guy out pitch. If you would like a little more interior space, or improved snow shedding, move the setbacks in toward center one - two inches from recommended setback, click the pole an inch higher and use the side guy outs.
Silvertip, Cimarron, Lil Bug Out, and Redcliff shelter directions can be found on our website.
Pitch Tips:
- If you have a bell shape at the bottom then your footprint is too big. This is caused by overstretching the fabric when setting the stakes.
- The diameter and radius of the shelters can vary by a small amount due to uneven terrain or variances in manufacturing. After pitching a few times you'll find the diameter where your tipi is happiest.
- Uneven ground - set the uphill side as normal, then set the downhill side. You will have slack in the downhill side that can then be reduced by using the guyouts.
- To pitch in wind set 1-3 stakes on the upwind side first.
- Storm worthiness is determined largely by how solid your stakes are. Mixing in a few longer or beefier stakes such as our Twisted Stakes helps in bad weather or loose soil.
- A flat rock under the pole will keep it from sinking into soft ground.
- Our tipis have inner and outer stake loops. Pitch with the inner loops to raise the sod skirt and allow more venting in warm weather. Pitch with the outer loops to seal the skirt to the ground.
- Watch the skirt when staking! You’ll put a hole in your skirt if you’re careless.
Care & Maintenance:
- Never leave your shelter unattended in heavy snow. The pole will break before the canopy will tear.
- Store your tipi clean and dry. Dirt or sand can abrade the waterproof coating, and moisture leads to mildew.
- To clean, hand wash in woolite or other gentle cleanser, or pitch and spray with a garden hose. Hang or pitch to dry.
- Avoid long term UV exposure.
- If you get pinholes from ember burns, seal them with a dab of seam sealer.
- Small tears can be repaired with tenacious tape.
SEAM SEALING:
- To seal the shelter, pitch it normally and seal the outside seams.
- You can run a thin bead of sealant along the seam, press it in with a finger, and wipe away excess on a paper towel.
- Alternatively, you can use an acid brush from a hardware store to spread the sealant.
STOVE SET UP:
- How To set up stove pipe. Please read below
- Stove set up instructions included in stove bag
How To Roll a Titanium Stove Pipe (and other tips for stove pipes)
How to Roll a Titanium Stove Pipe
Rolling a stove pipe can be difficult the first time, especially if you do not have a friend to help. It can be done solo, by yourself in the backcountry the first time, but you shouldn't. Why? Simply because you may damage it. Once the pipe has been burned in, rolling it by yourself in the back country is simple. Below is a video of two people rolling a stove pipe.
Stove Pipe Tips:
- Using gloves is much safer in the backcountry
- Cleaning out creosote build up is NEVER a bad idea
- You can re-anneal a damaged pipe
How to Re-anneal a Damaged Pipe:
Sometimes pipes get out of alignment or develop a cone shape over time. Here is how to fix it.
- Roll the pipe up the opposite direction
- Stick it on the grill or in the oven at 400 degrees for a few minutes (20 is more than enough)
- Once cooled, carefully re-roll the pipe into the intended shape.
- Enjoy
LINER INSTALLATION
- It's easier to watch!
Videos & Media
MEDIA:
SIZE COMPARISON:
FAQ
FAQ
INFO ON HOT TENTS:
Temperature Rating
- We use high temp silicone coated fiberglass material, rated to several thousand degrees, for the stove jack. The tent material never touches the hot pipe. If there are any pinholes from floating embers, they can be sealed with a small dab of silicone without damaging the shelter.
Condensation
- Condensation may occur in single-wall shelters, but can be managed with liners and stoves. For more information, check out our tips on managing condensation below
How to minimize tent condensation
Tent Condensation
The best ways to minimize tent condensation.
How to Prevent Tent Condensation
Condensation inside a tent happens when warm, moist air from the inside meets cooler air outside, causing the water vapor to condense on the tent canopy. This is most likely to happen at night when temperatures drop. Here’s how you can prevent it:
1. Smart Site Selection
Choosing the right camping spot can greatly reduce the chances of tent condensation:
- Pick dry and elevated ground: Avoid low-lying areas where cold air and moisture collect, like creek beds or valley bottoms.
- Stay away from water sources: Camping right by a lake or river can lead to higher humidity inside your tent.
- Find a breeze: A light breeze can carry moisture away from your tent, helping to reduce condensation buildup.
- Camp under trees: Tree canopies help create a warmer microclimate around your tent, which can reduce condensation on the tent walls. Just make sure to avoid dead trees or hanging branches for safety.
2. Ventilation
Ventilation is one of the most effective ways to prevent condensation. By allowing airflow through the tent, you reduce the difference in temperature and humidity between the inside and outside of the tent.
- Open doors or windows: Partially unzip the door or vents at the top or bottom of your tent to promote airflow.
- Lift the tent skirt: For tents with adjustable skirts, lifting the sides will increase ventilation and prevent condensation from building up inside. In our testing, a tight sod skirt vs a tent with a couple inch gap, the difference is condensation averages around 80 percent. The downside is more breeze.
3. Choose the Right Shelter Size
The number of people inside the tent can influence condensation:
- Smaller tents with more occupants are more likely to experience condensation because more people mean more warm air and moisture in a confined space.
- Larger tents with fewer people allow the moisture to spread out over a bigger area, reducing its impact.
How to Manage Tent Condensation
Even with preventive measures, condensation can still occur. Here’s how to deal with it:
1. Use Liners
- Liners act as an interior shield that catches drips and directs moisture to the tent floor. This transforms a single-wall tent into a double-wall tent, providing an extra barrier against condensation.
2. Tent Stoves
- Portable wood stoves are a great way to dry out a tent in colder weather. The heat from the stove warms the air inside, allowing it to hold more moisture, which in turn evaporates condensation. Additionally, tent stoves can help dry wet gear inside the tent, further reducing moisture levels.
3. Drying with a Cloth
- Quick wipe-downs with a cloth or microfiber towel can effectively manage condensation. Simply wipe down the inside of the tent to remove moisture and prevent it from dripping onto your gear.
Why Does Tent Condensation Happen?
Understanding why condensation happens can help you manage it better. The key factor is the temperature difference between the inside and outside of the tent. Here’s a breakdown:
- Warm air holds more moisture than cold air. When the air inside the tent cools down (especially overnight), the moisture in the warm air condenses onto the cooler tent walls.
- Humans release moisture: Every breath you exhale adds water vapor to the air inside the tent.
- Body heat: At 98.6°F, your body is a natural heat source. When warm, moist air from your breath and body meets the cooler tent fabric, condensation forms.
Why Is Tent Condensation a Problem?
Condensation can range from a mild inconvenience to a trip-ruining nuisance. Here’s why it’s worth taking seriously:
- Minor inconvenience: A light film of moisture on the tent walls may not seem like a big deal, but brushing against it can soak your clothes or sleeping bag.
- Major annoyance: When heavy condensation accumulates, a rainstorm or strong wind can shake loose the droplets, causing a misty, damp environment inside the tent.
In severe cases, the interior of the tent can become saturated with moisture, leaving your gear damp and your morale low. Luckily, this scenario is avoidable with proper site selection, ventilation, and condensation management strategies.
Effective Solutions for Tent Condensation
Here’s how to address both sides of the condensation equation:
- Control warm, moist air inside: Improve airflow and ventilation to move moisture out of the tent.
- Handle cold air outside: Prevent the warm air inside from coming into contact with the colder tent canopy by using liners or increasing airflow.
Final Tips: Ventilation, Site Selection, and Shelter Size
- Ventilation is key: Adjust your tent’s doors and skirts to maximize airflow without making your tent too drafty. More airflow means less condensation.
- Select your campsite carefully: Avoid damp, low-lying areas and seek spots with a natural breeze.
- Consider tent size: Larger tents with fewer people reduce condensation risks. If you’re in a smaller tent, focus on airflow and other strategies to minimize moisture.
Tent condensation is inevitable at times, but with the right approach, it doesn’t have to ruin your camping experience. Use these strategies to stay dry and comfortable, even in humid or cold conditions.
Carbon Monoxide
- Carbon monoxide is not a concern in these shelters due to the peak vent and air flow from the zipper and sod skirt. If necessary, leave a door unzipped for more venting.
FAQ:
Does the 12 person tipi have interior hang loops for drying?
- The method we prefer is a prusik knot on the pole for both drying heavy gear and attaching a nest. The prusik on a pole method is strong and secure.
What about condensation?
- It's single wall, there will be condensation in some conditions. Liners help a lot, as do stoves. Mostly you just have to learn to manage it. Read 5 Ways to Manage Condensation in Seek Outside Tents above
Shipping Notes
- Free Standard Shipping on $100+ Orders to the USA.
- Except Preorder products are shipped in 48 hours.
- Delivery to the USA:
- Standard Shipping : 3-10 business days
- If time is of the essence, please consider selecting expedited delivery for faster service.
Exchange/Return Notes
- We offer a 30-day return/exchange service after receiving.
- Final sale items are not eligible for returns or exchanges.
- To process your return/exchange, please contact us at [email protected]
- Please click here for more details>>> Return & Exchange Policy